A-dec 551 Dental Assistant's Instrumentation Overview
Duration 10:36Watch this detailed overview on how to maintain and best utilize A-dec 551 dental assistant's instrumentation.
Video transcript
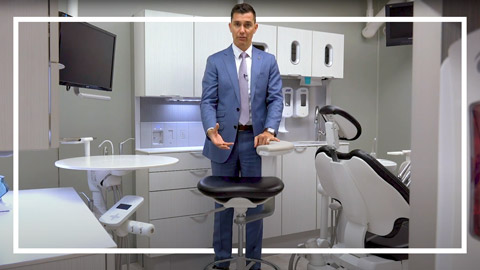
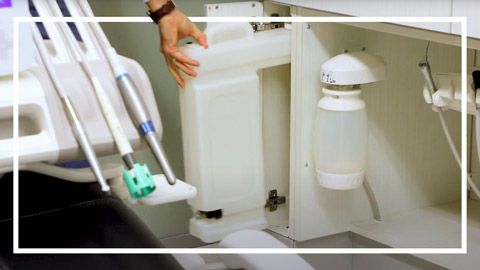
Alright, so now we're gonna talk about assistant instrumentation. In this situation, we have the assistant's instrumentation attached to the chair via a support link. We can also utilize our rear work surface assistants instrumentation, whether that's our 545 or our 541. As far as it's concerned, but for the purposes of this video, we're going to use a 551 assistants instrumentation. So with that being said, the first thing that I want to talk about is the actual canister itself. So when you, before you take this cap off of your canister, you're gonna wanna make sure that you turn the vacuum off in your office. If you have the vacuum on more than likely, this cap is going to be impossible to get off. There are times when the vacuum can't be turned off when they need to get into this canister.
So what you would want to do is you would want to open your valves and create a path of least resistance for this to have a little less pressure inside here. So when you take this canister off, you'll see that we have the cap here. Okay. And then inside there, we have our trap itself. Okay. And we're gonna wanna replace these on a regular basis and clean these, but when you place this back in, you're gonna wanna make sure that when you place the cap back on that the cap has the cutout facing the valves themselves. If you place this backwards, you're not, you're gonna cut off the vacuum to your high volume and your saliva ejector. So we're gonna wanna make sure that that cap gets placed on properly. The other thing to recognize is that there is an O-ring around this cap.
If you ever hear a hiss or you ever hear any type of waning from the assistant's instrumentation, get that silicone lubricant that we've talked about multiple times, go ahead and put it on with a cotton tip applicator. And that way that will help with that little hiss that you're gonna hear from your assistant's instrumentation. From the canister itself, you have the tailpiece that attaches to the canister. The tailpiece has an O-ring inside of it that you're gonna wanna lubricate. And that will also help with the hissing that you're gonna hear from your assistant's instrumentation, as well as an O-ring around the actual cap canister itself. You'll just want to pop those off and you'll want to go ahead and place the O-ring, you'll wanna place the lubricant on the O-rings themselves. So as we move up from the canister, the vacuum canister itself we're going to move up to the valves themselves to be able to show you how these work and how we maintain these. One thing to notate on all assistant's instrumentation. We have the ability to swivel the actual holder valves themselves. They swivel our spin on an axle, and so that we can actually independently spin each one of these positions and rotate them to how we would like to have them.
So when they show up at your office, more than likely, they're gonna be in a straight line here, if we want to get the high volume out of the way, if we're in a hygiene, operatory and we're only utilizing the saliva ejector and the syringe. We can move that out of the way to where we can utilize. Just those two, that will be easier to pick up as far as it's concerned. From there, if we're going to look at the actual high volume itself and the valve itself, what want you to pay attention to is there's actually an additional trap in the tubing itself. It's a little metal trap. That's going to block any type of composite or large material that's been picked up in the mouth from getting stuck in the tubing or getting sucked through the tubing. Okay.
And then from there we have four O-rings on the HVE itself. You've got an O-ring that slides into the tail piece where the valve sits. You've got an O-ring on the open and close of the valve itself. You can see those two O-rings right there. You're gonna wanna lubricate those once a month. And then the last thing that we need to lubricate is inside the tip. There's an O-ring inside the tip. That O-ring will allow you to maintain the tip inside the actual valve. If you feel like it's really tough to place the tip inside of the valve itself, we might wanna lubricate that O-ring or get a new O-ring. That's just something to pay attention to. If we're not lubricating the O-rings themselves, it's gonna be very hard to open and close the valve as well as very hard to swivel this, if needed.
So that's something to pay attention to on the high volume. So as we move into the syringe what's really important to know is that we recommend utilizing our autoclavable tips. The reason that the autoclavable tips are important is because when we manufacture these, we manufacture these with a beveled edge at the, the end of the tip, which is going to pass through the O-ring in the nut, on the syringe tip, which you'll also notice about these tips is that there's three beveled cutouts in this syringe tip, so that they lock into place. Once you seat the syringe tip properly in the actual syringe, if you run into a situation where you're getting some leaking or you get getting water in your air, when you're depressing your air button or anything like that, it's more than likely because the O-ring that's actually in the, the nut itself has been damaged. And a lot of the times, what we find is that most doctors are utilizing other manufacturers tips, and they're actually disposable tips—more than likely plastic disposable tips. And when those disposable tips are manufactured, they're manufactured on a line to where they're cut and that cut creates a sharp edge. And when it slides through that, O-ring it damages that O-ring every time it passes through that O-ring. And you can imagine when you turn the room over every single time, you're putting a new tip in that room. So it's going to wear out a lot faster than you would think. So if we run into that issue, what we can actually do is we can take this nut off, we can unscrew it, and then we can get a syringe tip replacement kit or an O-ring kit here. And at the end, there, there's a little brass piece that has an O-ring inside there.
And what we're gonna wanna do is we're gonna wanna replace this, this O-ring right here. That's the, that's the piece that gets damaged, that will cause the crossover of water into your air. So when we replace that, we can screw this back on. We can screw the nut back on place, our tip back in, and that will let us know that we don't have any issue with the actual tip itself. If we find that we're getting sticky buttons or anything like that, where they're leaking a little bit after you depress your air button or anything like that, or they stay depressed after you release that, they're not springy any longer. We actually have a syringe button kit where you can actually take an allen wrench, your smallest allen wrench that we have. And we would actually go in here.
We would unscrew that and the buttons would pull out from there. We would replace those buttons. We would replace the springs. And we would put a little bit of silicone lubricant in there to make sure that they glide well. And that's gonna help with your sticky buttons on your syringe. One other thing to notate as well is that this syringe actually is removable. And why this is important to notate is if you don't screw this all the way on, you might not get any air pressure coming out of your syringe or any water coming out of your syringe. So make sure that that is tightened completely down, that will allow you to know that we're not having any issues and we're getting air out of our syringe. Lastly, if as we move away from the instrumentation itself, we can get into the touchpad, the touchpad we covered earlier, but just to know what we have as far as the assistant is concerned, we have a cuspidor bowl, rinse.
We have a cuspidor cup fill. We have the ability to turn our light on and off and toggle through the light settings on the touchpad for the light. We have the manual adjustments as far as our up, down and left and right buttons for the movement of the chair. And then we have four preset buttons for the assistant to utilize. The first button is the button that is the same exact button that is on our doctor's deluxe touchpad plus. That is the entry and exit button. We also have the first treatment position button, which is the same treatment position button that will be on our deluxe touchpad plus. From there, if we want, we can actually store an additional treatment position. A lot of times what doctors will do is they'll store the first treatment position as their maxillary setting.
And then the second button will be their mandibular setting, which will allow them to adjust the patient as they need for both of those treatment positions. The last button for the assistant is that last stored position. And that will allow you to if needed, get up from the room and place the position, the patient into a comfortable seated position, and then come back into the room after you need to leave the room and press that button again, and it will lay them back into the position that you had them previously. So that is your assistant's touchpad instrumentation, as we move off of the 551, and we talk about the rear assistant's instrumentation for your 545. One thing that's really important to notate is that the assistants work surface is flexible in a sense that you can raise or lower that if you feel like that, when you're seated in your assistant's stool, and you get up underneath that work surface, that it's too high or too low, there's actually a snap ring. That's up underneath this arm underneath here. And if we go ahead and lift this up and move the snap ring higher or lower, we can then drop down that work surface to where it's at the correct height for that assistant.
We also have our assistant's instrumentation over here, and we also have a tray on our 545 that will allow us to store more instruments as needed for the procedure.
Related videos
A-dec 522 Dental Assistant's Stool Overview
Get tips on using and adjusting the A-dec 522 dental assistant's stool.
A-dec ICV Vacuum-Line Cleaning System Overview
Learn how to use the A-dec ICV vacuum-line cleaning system.
A-dec 500 LED Dental Light Overview
Review the innovative features of the A-dec 500 LED dental light.